120 Photoshop tips, tricks and fixes
Improve your skills with these great Photoshop tips.
Layers tips
43. Converting layer styles
Converting a Layer Style to a normal pixel-based layer gives you greater control to edit the contents. To do so, add a style then right-click Effects and choose Create Layer.
44. View one layer
If you're working with multiple layers and you want to view one layer on its own, there's no need to hide all the others manually, simply hold down Alt and click the Eye icon of a layer to make every other layer invisible. Hold down Alt and click again to reveal them.
45. Invert a layer mask
After adding any Adjustment Layer, hit Cmd/Ctrl+I to invert the Layer Mask and quickly hide the effect, then paint back over the image with white to selectively reveal the adjustment.
Article continues below46. Unlink layers and masks
You can move either a mask or an image independently of one another by clicking the link between the two thumbnails in the Layers Panel. Highlight the thumbnail you want to reposition, then grab the Move tool.
47. Quick copy
Hold down Alt and drag a mask, style or layer to
quickly duplicate it.
48. Convert the background
Double-click the Background Layer and hit OK to convert it to an editable layer
49. Adjustments
Always use Adjustment Layers rather than directly editing a layer. This gives you three advantages: you can edit it at any time, control the strength with Opacity, and use a mask to make it work selectively.
Sign up to Creative Bloq's daily newsletter, which brings you the latest news and inspiration from the worlds of art, design and technology.
50. Move query
When using the Move tool, right-click over a point in the image for a list of all the layers you're hovering over.
51. Panel Options
The Layers Panel is the most important box in Photoshop, so you'll want to make sure it's set up properly for your needs. Choose Panel Options from the Fly-out menu to select different thumbnail sizes and content.
52. Move layers up or down
You can move layers up or down the stack in the Layers Panel while watching the image change. Hold down Cmd/Ctrl and press ] or [. Add in Shift to move a layer right to the top or bottom.
53. Fill shortcuts
You can press Alt+Backspace to fill a layer or
selection with the Foreground colour, Cmd/Ctrl+Backspace to fill a layer or selection with the Background colour, or Shift+Backspace to quickly access the Fill Options.
54. The 50% grey layer
A new layer filled with 50% grey is useful in lots of situations. For example, you can dodge and burn with it, add texture, or manipulate a Lens Flare effect, all in a completely non-destructive way. To create a 50% grey layer, make a new layer then go to Edit>Fill, then set the Blend Mode to Overlay.
55. Layer group shortcut
Layer Groups are incredibly useful, but don't bother clicking on the Layer Group icon, as you'll have to add layers to the new group manually. Instead, you should highlight several layers and either drag them to this icon or alternatively hit Cmd/Ctrl+G.
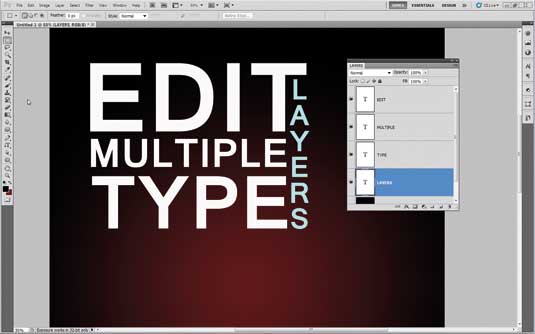
56. Edit multiple type layers

To apply a change of font or size to multiple type layers at once, hold down Cmd/ Ctrl and click the layers in the Layers Panel to highlight them, then simply select the Type tool and change the settings in the Options Bar.
57. Layer mask views

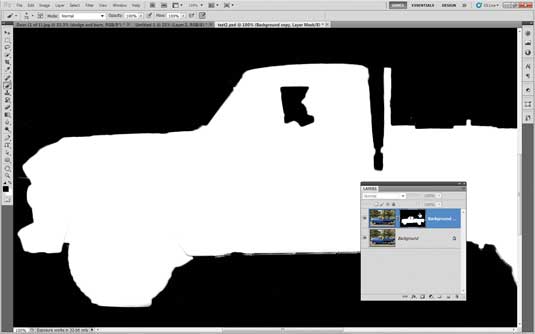
Hold down Alt and click a Layer Mask thumbnail to toggle between a view of the mask and the image. Hold down Shift and click to turn the mask on or off.
58. Quick full layer masks
You can Alt-click on the Layer Mask icon to add a full mask that hides everything on the layer.
59. Lightning fast layer copies
Hold down Cmd+Alt and drag any layer to instantly make a copy.
60. Colour code layers
Use colour coding to organise your Layers Panel. Right-click over a layer's eye icon to quickly access 8 colour code choices.
61. Select similar layers
To quickly select all layers of a similar kind, such as shape or type
layers, highlight one of them and then go to Select>Similar Layers.
62. Change opacity
When not using a painting tool, you can change layer Opacity
simply by pressing a number key. Hit 1 for 10%, 5 for 50%, and 0 for 100%.
63. Quick masking
You may be familiar with Color Range in the Select drop-down menu. But did you know that you can access a similar command through the Color Range button in the Masks Panel? (Window>Masks). This allows you to quickly make a mask by sampling colours, which can be used for making a quick spot colour effect.
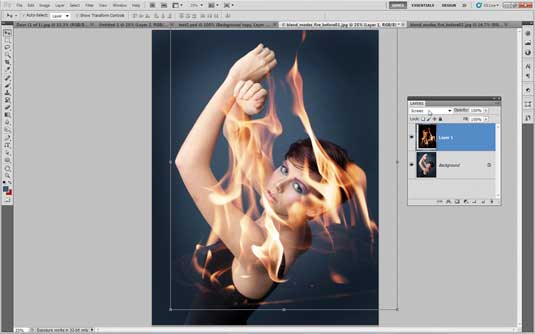
64. Step by step: blend fire effects
A: Copy in the fire

Open a portrait image and a generic fire image, then grab the Move tool and check Auto-Select Layer and Show Transform Controls. Drag the fire image into the girl image to copy it in, then change the Blend Mode of the layer to Screen.
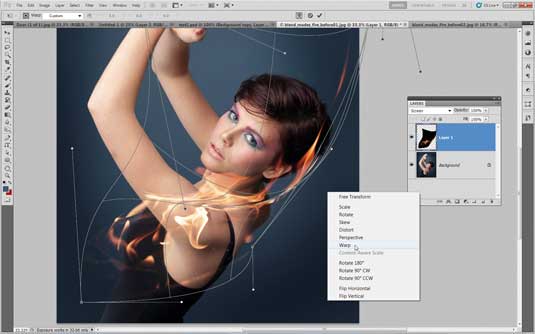
B: Position and warp

Click the bounding box to transform the fire layer, then resize, rotate and position the layer. Right-click while in Transform mode and choose Warp to wrap the fire around the body. Hit Cmd/Ctrl+J to copy the fire layer and transform again to build up the effect.
Next page: Tips for mastering Photoshop's tools

The Creative Bloq team is made up of a group of art and design enthusiasts, and has changed and evolved since Creative Bloq began back in 2012. The current website team consists of eight full-time members of staff: Editor Georgia Coggan, Deputy Editor Rosie Hilder, Ecommerce Editor Beren Neale, Senior News Editor Daniel Piper, Editor, Digital Art and 3D Ian Dean, Tech Reviews Editor Erlingur Einarsson, Ecommerce Writer Beth Nicholls and Staff Writer Natalie Fear, as well as a roster of freelancers from around the world. The ImagineFX magazine team also pitch in, ensuring that content from leading digital art publication ImagineFX is represented on Creative Bloq.
