How to embed your site on Facebook
Ste Brennan of Code Computerlove explains how to embed your site within Facebook, from initial set-up to sending invitations and posting to users’ walls.
- Knowledge needed: JavaScript, HTML, CSS, basic PHP
- Requires: Active Facebook account and Facebook JavaScript SDK
- Project Time: 1 day
- Support file
For many, Facebook is the web and the first port of call for socialising, sharing and much more. Its deep-rooted, social eco-system enables users to share their life and experiences, and it should not be overlooked in any digital marketing strategy.
Many organisations have already established a strong presence on the platform. Increasingly, brand-specific Facebook pages are promoted rather than websites. Recent research by digital consultancy Beyond states that ‘almost a quarter of consumers would prefer to receive information from a brand through Facebook rather than its website’.
In this tutorial I’ll explain how to develop on the platform and how to embed your sites within Facebook so that they appear ‘native’ to it, as well as helping to create a seamless experience for users as they browse Facebook.
01. Getting started
To new developers, Facebook tools and SDKs can appear daunting. The platform comprises various technologies and terminologies and at the time of writing, documentation and examples are not as complete as they could be.
With this in mind, the demo’s main purpose is to show examples of key features such as authentication, authorisation, obtaining and using profile data, and adding integration points that enable users to promote, invite and share your site within Facebook. The site is written using basic PHP; however, the tutorial focuses on the JavaScript SDK rather than any specific server-side SDK.
The JavaScript SDK was chosen for two main reasons. First, the code can be applied to a site running on any server stack rather than tying it to PHP. Second, using it reduces the load and bandwidth on your server because interaction happens between your visitor’s browser and Facebook servers directly.
The demo website has been developed as a Facebook IFrame Canvas application. The term Canvas has nothing to do with the HTML5 element of the same name – it’s just an unfortunate coincidence!
Daily design news, reviews, how-tos and more, as picked by the editors.
Each Canvas application sits within its own page on Facebook (also known as a Canvas page). These pages exist under the apps.facebook.com sub-domain. Canvas applications look like they’re part of Facebook, which makes them feel more ‘native’ than standalone websites to users. Canvas applications can be one of two types: FBML (Facebook Markup Language) and IFrame.
Traditionally, FBML applications have been the preferred method for developing Canvas applications. When a user visits an FBML Canvas page, Facebook makes a request to your web server for FBML pages. As web browsers cannot natively render FBML, Facebook processes these pages and transforms the output so it can be viewed within the application’s Canvas page.
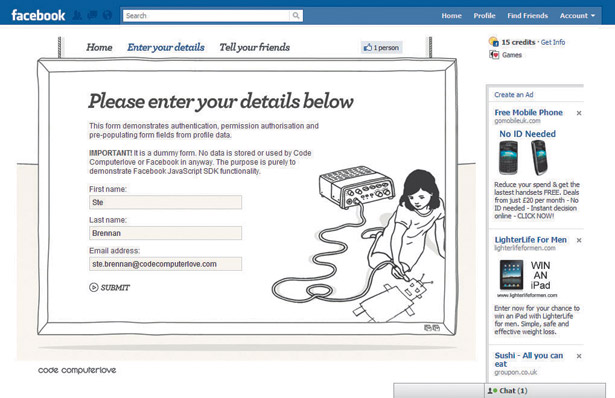
FBML Canvas applications are now discouraged by Facebook in favour of IFrame-based applications. When a user visits your IFrame Canvas page, Facebook displays pages from your website directly within an HTML IFrame embedded in the page. IFrame applications make life a lot easier for developers because you’re in control of the rendering and publishing of HTML pages and you don’t need to invest a lot of time learning FBML.
02. Setting up with Facebook
You’ll need to set up your application with Facebook. Set-up is free and happens pretty much instantaneously, because there’s no application approval process to go through.
Log in to Facebook and visit the developer’s application at facebook.com/developers. Here you can set up new applications and edit existing ones. You can also access SDK documentation and interact with the Facebook developer community.
Click the + Set Up New Application button (located in the top-right of the page). If this is the first time an application has been set up with your Facebook account, you’ll need to go through an identity verification process by entering either your mobile phone number or your credit card details. Don’t worry though, set-up is still free!
The next step is to enter a name for your application and agree to Facebook’s terms and conditions. Don’t be too concerned about the accuracy of the name at this stage: it can be altered later if required.
At this stage we haven’t told Facebook anything about the application other than its name. From the developer’s homepage, you should now see the application listed under My Applications. Click the application’s name and you’ll then be presented with an application overview page. From here, click Edit Settings.
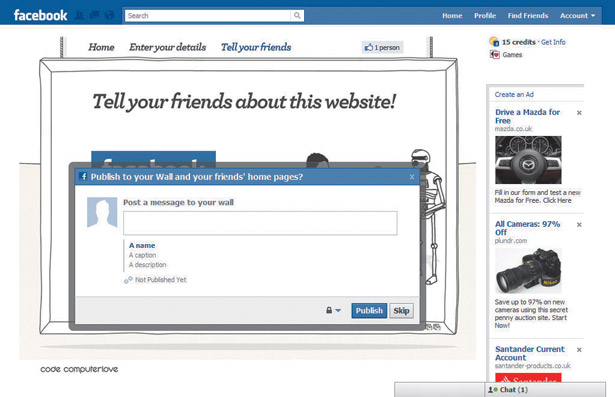
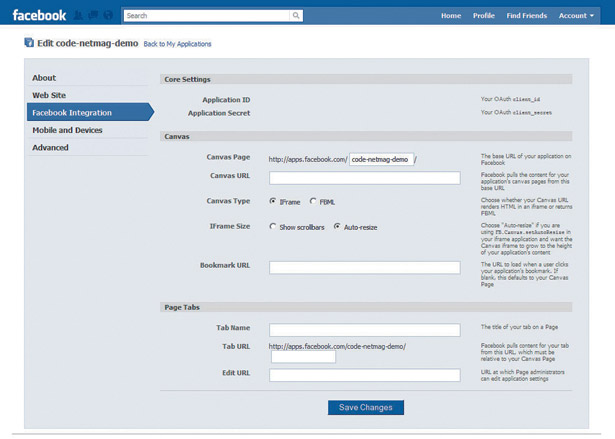
Two key sections when editing an application are About and Facebook Integration. About is where you provide basic application information. At the very least it’s important to provide a suitable name and description as well as a 16x16 pixels icon and a 75x75 pixels logo. These are important because they’re displayed throughout Facebook whenever the application is mentioned by users. The icon is also used as a browser favicon whenever a user visits the application’s Canvas page. Both icons and logos can be GIFs, JPGs or PNGs.
Facebook Integration is where you provide more technical details about your application.
First enter a Canvas page name. This is resolved to the Facebook URL for your application. Canvas pages always begin with apps.facebook.com and have a name limit of 20 characters. For example, the Canvas page for the demo website is apps.facebook.com/code-netmag-demo/.
The next step is to enter the application’s Canvas URL. This is the URL to your website on your web server. It’s this address that’s loaded into the IFrame when a user visits your application’s Canvas page.
Finally, you need to ensure that Canvas Type is set to IFrame and IFrame Size is set to Auto-resize.
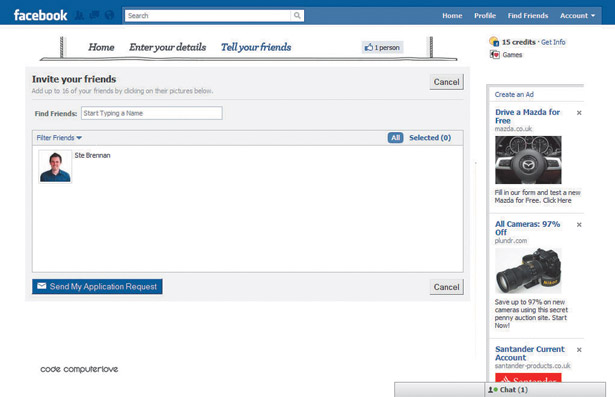
It’s important to state here how Canvas pages and Canvas URLs work with each other. If a Canvas page is http://apps.facebook.com/my-test-app/ and the Canvas URL is http://www.mywebsite.com/, whenever a user visits http://apps.facebook.com/my-test-app/, they’ll see content in the IFrame served from http://www.mywebsite.com/.
A great feature of IFrame applications is that URLs are ‘mapped’ through to your website. For example, if a user browses to http://apps.facebook.com/my-test-app/about-us/, then the IFrame in your Canvas page will request content from http://www.mywebsite.com/about-us/.
That’s it: the application is now set up with Facebook. There are a few points to bear in mind at this stage.
Firstly, if your website build process includes a number of environments such as ‘local development’, ‘customer preview’ and ‘live’, you’ll need to set up an application for each of these environments.
Secondly, by default Canvas pages are publicly accessible. Normally this isn’t a problem because the IFrame will be requesting pages from your private network, accessible only to you (such as http://localhost/). You can, however, prevent non-authorised users accessing your Canvas pages completely by putting your application into Sandbox Mode. You can do this in the Advanced section when editing your application details.
03. Getting started with your website
When a user visits an IFrame application’s Canvas page on Facebook, the application is ‘embedded’ via an HTML IFrame in the page. The application does not physically exist on a Facebook server. It’s a website hosted by you.
This means you’re free to build on any server-side technology stack, whether that’s PHP, ASP.NET, Rails or any other. Additionally, because content is displayed through an IFrame in Facebook, you’re free to serve HTML, XHTML, HTML5, Flash or any other technology that can be handled by web browsers.
There are, however, a few things you need to bear in mind or apply as part of your build process. At time of writing, some of these are documented; others aren’t and have been learned the hard way!
04. Your website design should not exceed a width of 760 pixels
760 pixels is the size of the IFrame on an application’s Canvas page. It’s recommended that your website design does not exceed this. There’s no limit to the height of your content, however, and the JavaScript SDK does include the FB.Canvas.setSize() function, which enables you to resize the IFrame to fit the height of your content if needed.
05. Have a publicly accessible homepage
It’s good practice to make sure that the homepage of your website is publicly accessible. Even if a user is not logged into Facebook, they should be able to see this page. It should be informative and tell the user what the application is all about. Having a homepage that either asks a user to log in or grant your application access to special Facebook permissions may be detrimental to your application’s success on the platform.
06. Linking to sub pages within your application
You have two options here: you can set each link to be the full Facebook URL or you can use relative URLs. Using relative URLs will ensure that only the IFrame content is reloaded, not the parent Facebook page.
<a href="/enter-your-details/">Enter your details</a>
This will make your application feel more responsive because you’ll be loading only a portion of the page. However, you may want users to visit the full Facebook URL for a page and take advantage of Canvas URL mapping. In the demo website I’ve done this with the top navigation items. For example:
<a href="http://apps.facebook.com/code-netmag-demo/enter-your-details/" target="_top">Enter your details</a>
One key difference here is that you need to include the target="_top" attribute. Because the website is in an IFrame, if you don’t do this (or use a similar JavaScript method to achieve the same effect), then when you click the link, the full Facebook Canvas page will load within the IFrame.
07. JavaScript libraries
This tutorial does not cover any server-side Facebook SDK. Only the
JavaScript SDK is discussed. It’s recommended that you link directly to the
SDK on Facebook’s servers. This will ensure that you’re running the correct version and will also save you server bandwidth.
<script type="text/javascript" src="http://connect.facebook.net/en_US/all.js"></script>
You can find more detail about the JavaScript SDK at developers.facebook.com/docs/reference/javascript/.
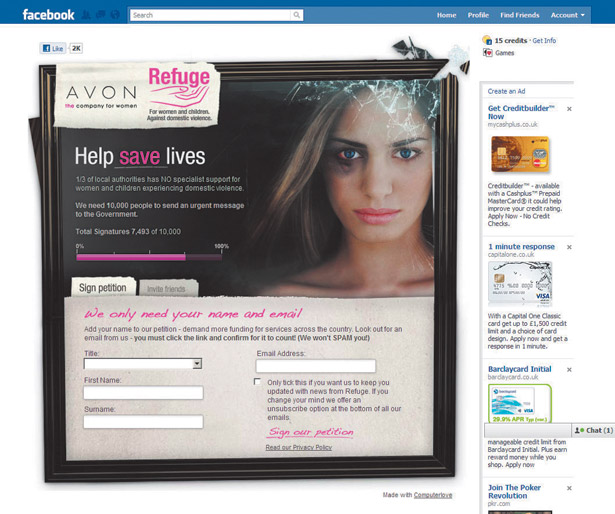
The demo site also links to jQuery, which is served from Google. I use jQuery here to help with basic DOM manipulation and event handling. Finally, the demo comes bundled with scripts/fbhelper.js.
This is a script developed for this tutorial that encapsulates the common JavaScript SDK calls used throughout the site. Feel free to modify this or extend it for your own applications.
08. Initialising the SDK
Once you’ve included the JavaScript SDK, you need to make sure that your document contains the <div id="fb-root"></div> element. This is required for the SDK to function correctly. Immediately after this, you then initialise the SDK by calling FB.init(). In the tutorial demo, all of this can be found in header.php and initialisation is wrapped up in the fbhelper.js file. Initialisation typically looks like this:
FB.init({ appId: YOUR APPLICATION ID HERE, cookie: true, status: true, xfbml: true, channelUrl: "http://www.mywebsite.com/channel.html" });
You can retrieve an application’s id from the application’s overview page on the Facebook developer’s application.
The above example includes one undocumented parameter called channelUrl. The value to this is the full URL to a channel.html file, which is included in the demo website code. It seems that this ‘hack’ helps with cross-domain communication issues on certain browsers. Check out the Facebook Developers' Forum for more information.
09. Setting the P3P header
It’s important you send the correct P3P header value in your website page responses. The problem here lies with a W3C standard called Platform Privacy Preferences (P3P) and third-party cookies. Adding this in the header will allow certain browsers (including Internet Explorer 8) to accept third-party cookies, which are required for the Facebook JavaScript SDK to run successfully for this tutorial. In the demo website you’ll find this in header.php:
header('P3P:CP="IDC DSP COR ADM DEVi TAIi PSA PSD IVAi IVDi CONi HIS OUR IND CNT"');
If you’re using ASP.NET you can use the Response.AddHeader method. Again this is undocumented, but if applied will save you a lot of headaches. You can find more information at adamyoung.net/IE-Blocking-iFrame-Cookies.
10. Authentication, authorisation and profile data
The demo has one form that requires the user to be logged in via Facebook so the application can pre-populate the field values from profile data. This can be found at apps.facebook.com/code-netmag-demo/enter-your-details/ and the source code at enter-your-details/index.php, scripts/enter-your-details.js and scripts/fbhelper.js. It’s recommended you inspect the code for a more detailed understanding of the overall process and have a look over the official Facebook documentation. However, at a high level, the form works as follows.
Firstly, we hide the form from the end-user until the verification stage is complete. Until then we display an animated ‘loading’ screen. This is simply handled by adding a ‘loading’ CSS class on the HTML div element containing the form and setting the necessary styles for that class in our style sheet.
Secondly, we check the user’s login status. Facebook now uses the OAuth 2.0 protocol for authentication. A full discussion around this is out of this tutorial’s scope; however, the JavaScript SDK does provide the FB.getLoginStatus() function to check a user’s login status. For example:
FB.getLoginStatus(function(response){
if (response.status != "connected") { /* User is logged in */ }
else { /* User is not logged in */ }
});
Thirdly, we check that the user has authorised the application to use their email address. By default, applications have access to a user’s basic profile data such as their name. Access to email addresses is restricted and an application must ask the user for permission to use it. The email permission is one of many ‘extended permissions’ that an application can request. A full list is documented here.
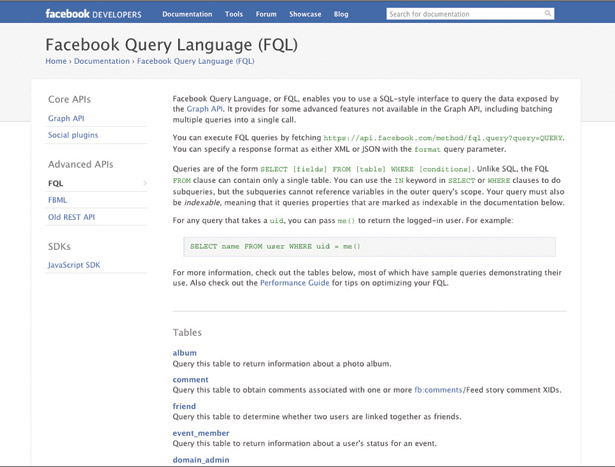
The demo website checks whether a user has granted the application email permission by issuing a FQL (Facebook Query Language) request. For example:
FB.Data.query("select email from permissions where uid=12345");
query.wait(function(rows) {
if (rows[0]["email"] == 1) { /* User has granted email permission */ }
});
You can read more about FQL at developers.facebook.com/docs/reference/fql/.
Finally we perform a Graph API request to obtain user profile data and update the form field values with the returned values. For example:
FB.api("/me", function(response) {
$("#FbUserID").val(response["id"]);
$("#FirstName").val(response["first_name"]);
$("#LastName").val(response["last_name"]);
$("#Email").val(response["email"]);
});
You can read more about the Graph API at developers.facebook.com/docs/api/.
If the user isn’t logged in, or hasn’t granted the application the ‘email’ permission, the application redirects the user to the Facebook authentication page, passing with it the application’s id, permissions required, and a URL to return the user to when they’ve completed the process.
For example:
top.location = "https://graph.facebook.com/oauth/authorize?client_id=YOUR_APP_ID&scope=email&redirect_uri= http://apps.facebook.com/code-netmag-demo/enter-your-details/";
The Facebook authentication page will handle logging the user in or registering a new user if required. It also prompts the user to grant permissions to an application. If for some reason the user cancels the process, they’re redirected back to the application and Facebook will append an error reason as part of the query string.
Take a look at header.php in the demo site. Here you’ll see code similar to the following that checks for these errors and redirects the user to a friendly ‘we need your details’ page:
if ( isset($_GET["error"]) ){ header('Location: /authorise_error.php'); exit(); }
Adding integration points
It’s important that you provide opportunity for users to share and talk about your site to make the most out of the platform. In the demo, there are three main ‘integration points’.
11. The Like button
This is displayed throughout the site and is a quick and easy promotional tool. When a user clicks that they like a site, it’s published to their Facebook stream, which may then be read by their friends.
It’s easy to embed the button into your site using XFBML. For example:
<fb:like href="http://apps.facebook.com/code-netmag-demo/" layout="button_count" />
XFBML is FBML that can be placed into a normal HTML document. The JavaScript SDK parses these XFBML tags so that your browser can render them. More information on the Like button and Social Plugins can be found at developers.facebook.com/plugins.
12. Publish to stream
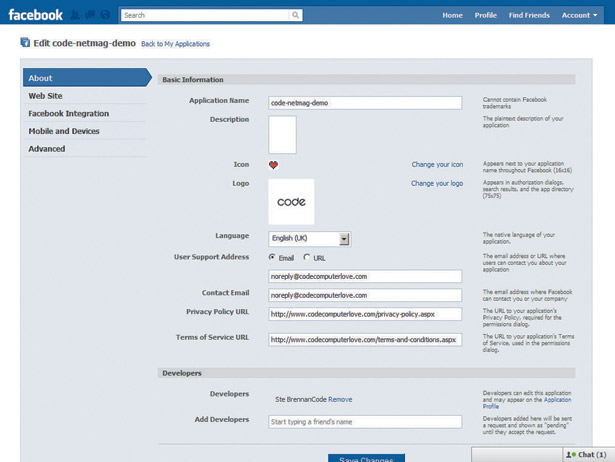
The JavaScript SDK provides a useful function that displays a ‘Publish to stream’ dialog. This is more advanced than the Like button. It enables the user to provide a custom message to be posted on their wall. It also enables the website owner to add their own promotional message and media.
In the demo site, you can find a link to this on the Tell your friends page. Clicking the Post on wall link calls the fbHelper.showPublishToStreamDialog() wrapper function, which in turn calls the FB.ui() JavaScript SDK function, similar to the following:
var url = "http://apps.facebook.com/code-netmag-demo/";
FB.ui({
method: "stream.publish", message: "",
attachment: { name: "My Test", description: ("Something about the post"), href: url },
action_links: [ { text: "Visit my site", href: url } ],
user_message_prompt: "Why not say something nice?"
}, function(response) { /* Fired when the post has been sent */ });
13. Invite your friends
The demo site also includes an ‘Invite your friends’ integration point. This is available by clicking the ‘Invite’ link on the ‘Tell Your Friends’ page.
Clicking this displays a dialog where the user can choose which of their friends to email a message about your site. Unfortunately, you need to have a bit more in-depth knowledge of FBML to use this dialog and we have to use the XFBML tag <fb:serverFbml>. This tag is used by the JavaScript SDK to render FBML on a Facebook server inside an IFrame.
For example:
<fb:serverFbml width="760">
<script type="text/fbml"><fb:fbml>
<fb:request-form method="POST" type="My Demo Application" action="http://apps.facebook.com/code-netmag-demo/tell-your-friends/" content="This is the content to show"
<fb:multi-friend-selector actiontext="Invite your friends" showborder="False" rows="2" email_invite="True" bypass="cancel" >
</fb:request-form>
</fb:fbml></script>
</fb:serverFbml>
More information on the <fb:serverFbml> tag and FBML in general can be found at developers.facebook.com/docs/reference/fbml/.
Hopefully this tutorial and accompanying demo will help in getting you started with developing Facebook applications. More and more developers are integrating their sites in Facebook, so why not take the plunge?
Ste is an experienced digital marketing developer and strategist currently working at Code Computerlove. Having worked with large scale clients such as HMV, The National Union of Students and Crown Paints developing both front and back end solutions, Ste is now heavily involved in mobile and emerging platforms, from strategy and idea generation to implementation and delivery.
Liked this? Read these!
- How to build an app: try these great tutorials
- Free graphic design software available to you right now!
- Brilliant Wordpress tutorial selection
- Our favourite web fonts - and they don't cost a penny

The Creative Bloq team is made up of a group of art and design enthusiasts, and has changed and evolved since Creative Bloq began back in 2012. The current website team consists of eight full-time members of staff: Editor Georgia Coggan, Deputy Editor Rosie Hilder, Ecommerce Editor Beren Neale, Senior News Editor Daniel Piper, Editor, Digital Art and 3D Ian Dean, Tech Reviews Editor Erlingur Einarsson, Ecommerce Writer Beth Nicholls and Staff Writer Natalie Fear, as well as a roster of freelancers from around the world. The ImagineFX magazine team also pitch in, ensuring that content from leading digital art publication ImagineFX is represented on Creative Bloq.
